Before we get started, please note that you cannot be using a MAPI server with 64-bit Office; GP email will not work with that configuration. I’ve been told it works if you are using Exchange Server or Exchange 365, but I do not have those specifics. Bottom line - if you want to run GP e-mail with MAPI, you need to be running 32-bit Office. This is true as of 8-3-2016, but times change.
System Setup – Done only once for the whole system
Administration | Setup | System | System Preferences
Here, you indicate:
1. The mail Server Type, for COMPANY this is MAPI
2. You can protect the .docx documents sent as attachments with a password, such that the recipient cannot open the document in Word without the password. You can also select whether that password is Auto generated by the System or is a specific Password on all .docx files.

Administration | Setup | System | User Security
To provide security access for the Sales series, add the following windows to task TRX_Sales_001 (or any task you choose). Type is Windows, Series - Sales. Check on Sales E-mail Setup and Sales E-mail Detail Entry.
Whole Company Email Settings – Done once per Company.
In this window you specify:
1. If you want to allow embedding documents in the message body and/or sending documents as attachments.
2. Also, you indicate the allowed formats for sending documents. At COMPANY, we limited the formats to .pdf and .docx only.

3. Click on Sales Series to setup defaults for the Sales Series for this company. In this window you enable which document types you want to be able to E-mail from the Sales Series.
4. You can also access this window from Sales | Setup | E-mail Settings
5. Enable checkbox: Checking this box will automatically check all of the boxes for you. You can then uncheck the ones you don’t want.
6. Message ID: Once a document is enabled, you can identify the default message you want to appear when that specific document type is E-mailed.
7. Have Replies Sent To: If you leave this field blank, the reply will go back to the message sender. Otherwise, enter or select an address that a customer can use to send a reply E-mail.
8. Allow Changing ‘Reply To’ Address at Entry: Marking this box will allow the user to change the default ‘Reply To’ address before they E-mail the sales document. If you mark this option, you can edit the reply-to address in the Sales E-mail Detail Entry window or in the Receivables E-mail Detail Entry window (for a credit memo). The Sales E-mail Detail Entry window is discussed later.
9. Allow Update of E-mail at Entry: Mark this box to change the E-mail message ID when entering the sales document. You can edit the message in the Sales E-mail Detail Entry window or in the Receivables E-mail Detail Entry window. If you don't mark this option, you won't be able to edit the subject or message body.

10. Click on Purchasing Series in the Company E-mail Setup window to setup defaults for the Purchasing Series for this company. In this window, you enable which document types you want to be able to E-mail from the Purchasing Series.
11. You can also access this window from Purchasing | Setup | E-mail Settings
12. Enable checkbox: Checking this box will automatically check all of the boxes for you. You can then uncheck the ones you don’t want.
13. Message ID: Once a document is enabled, you can identify the default message you want to appear when that specific document type is E-mailed.
14. Have Replies Sent To: If you leave this field blank, the reply will go back to the message sender. Otherwise, enter or select an address that a customer can use to send a reply E-mail.
15. Allow Changing ‘Reply To’ Address at Entry: Marking this box will allow the user to change the default ‘Reply To’ address before they send the purchasing document. If you mark this option, you can edit the reply-to address in the Purchasing E-mail Detail Entry window or in the Payables E-mail Detail Entry window (for a remittance advice). The Purchasing E-mail Detail Entry window is not discussed later.
16. Allow Update of E-mail at Entry: Mark this box to change the E-mail message of the message ID when entering the sales document. You can edit the message in the Purchasing E-mail Detail Entry window or in the Payables E-mail Detail Entry window. If you don't mark this option, you won't be able to edit the subject or message body.

Whole Company Email Message Setup – Done once per Company.
The Message Setup window defines what appears as the Subject and in the Body of a message E-mailed with a document attached to it.
1. Message ID: Enter an ID to identify the message. It’s a good idea to somehow indicate the associated Doc. Type in the ID. This is a 25-character field.
2. Message Type: Select Standard if you are creating messages for documents that you can send to customers or vendors. The other options are for Workflow. Workflow is beyond the scope of this document.
3. Series: Select the series in which you want this message to appear. The series available depends upon the message type. By selecting All, the message is available for all of the available series. You can’t select a document type or add fields to customize the message if Standard is the message type and All is assigned as the series.
4. Doc. Type: Select the type of Document that you want to assign to a message. This field is required when you select Standard as the Message Type and Sales or Purchasing as the series. If you use the Copy Email Message window to copy message information from an existing message ID to a new message ID, the Document Type is not copied to the new message, so beware.
5. Subject: Type how you want the E-mail subject line to read. You can insert fields here so that document specific information, such as document number and customer name from the document are displayed. Many fields are available. Select where you want the field to appear in the subject line and then select the field.
6. Body: This is where you type how you want the body of your message to read. You can insert fields here so that document specific information, such as the document number and customer name. Many fields are available; select where you want the field to appear in the subject line and then select the field.
7. Field: Select the field that you want to place in the message body or subject line. The fields available in the list depend on the document type you selected. Fields are not available if you select Standard as the message type and All as the series. The message shown in the screenshot below includes the {%SOP Number%}, {%Customer Name%}, {%Document Date%} and {%Customer PO Number%} fields.
8. Additional Fields checkbox: Marking this box will display additional fields in the Field list that you can embed for the selected document type. I was surprised at all of the fields available.
9. Have Replies Sent to: If you leave this field blank, the reply will go back to the message sender. Otherwise, enter or select an address that a customer or vendor can use to send a reply E-mail. For example, assume you have entered sales@company.com as the Reply To address. If you send a document in an E-mail to a customer, the customer receives the E-mail from Joe@company.com. When the customer replies to the E-mail, sales@company.com is used in the "To" field. The address you entered in the Sales E-mail Setup window, or the Purchasing E-mail Setup window is the default Reply To address. The Sales and Purchasing E-mail setup windows are covered later.

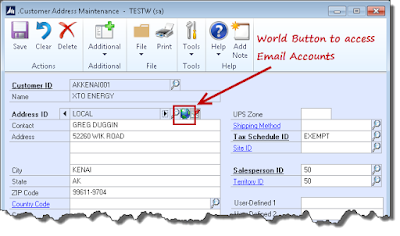
This is the Customer Address Maintenance window with the World Button identified.
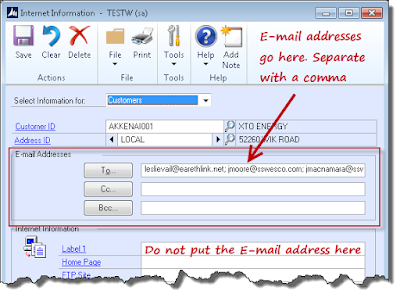
The window opened by the World button is the Internet Information window. It’s on this window that you should enter your customer E-mail addresses. Enter the addresses on the To, CC or Bcc lines. If you have multiple addresses, enter them all and separate each with a semicolon. You’ll be able to choose the proper address(es) at the document level. The list of addresses to choose from comes from here. Note that the E-mail address is tied to the Customer’s Address ID, not the Customer ID.
Customer E-mail Options – Done once per Customer.
To provide security access for the Sales series, add the following windows to task TRX_Sales_001 (or any task you choose). Type is Windows, Series - Sales. Check on Sales E-mail Setup and Sales E-mail Detail Entry.
Whole Company Email Settings – Done once per Company.
Administration | Setup | Company | E-mail Settings
In this window you specify: 1. If you want to allow embedding documents in the message body and/or sending documents as attachments.
2. Also, you indicate the allowed formats for sending documents. At COMPANY, we limited the formats to .pdf and .docx only.

3. Click on Sales Series to setup defaults for the Sales Series for this company. In this window you enable which document types you want to be able to E-mail from the Sales Series.
4. You can also access this window from Sales | Setup | E-mail Settings
5. Enable checkbox: Checking this box will automatically check all of the boxes for you. You can then uncheck the ones you don’t want.
6. Message ID: Once a document is enabled, you can identify the default message you want to appear when that specific document type is E-mailed.
7. Have Replies Sent To: If you leave this field blank, the reply will go back to the message sender. Otherwise, enter or select an address that a customer can use to send a reply E-mail.
8. Allow Changing ‘Reply To’ Address at Entry: Marking this box will allow the user to change the default ‘Reply To’ address before they E-mail the sales document. If you mark this option, you can edit the reply-to address in the Sales E-mail Detail Entry window or in the Receivables E-mail Detail Entry window (for a credit memo). The Sales E-mail Detail Entry window is discussed later.
9. Allow Update of E-mail at Entry: Mark this box to change the E-mail message ID when entering the sales document. You can edit the message in the Sales E-mail Detail Entry window or in the Receivables E-mail Detail Entry window. If you don't mark this option, you won't be able to edit the subject or message body.

10. Click on Purchasing Series in the Company E-mail Setup window to setup defaults for the Purchasing Series for this company. In this window, you enable which document types you want to be able to E-mail from the Purchasing Series.
11. You can also access this window from Purchasing | Setup | E-mail Settings
12. Enable checkbox: Checking this box will automatically check all of the boxes for you. You can then uncheck the ones you don’t want.
13. Message ID: Once a document is enabled, you can identify the default message you want to appear when that specific document type is E-mailed.
14. Have Replies Sent To: If you leave this field blank, the reply will go back to the message sender. Otherwise, enter or select an address that a customer can use to send a reply E-mail.
15. Allow Changing ‘Reply To’ Address at Entry: Marking this box will allow the user to change the default ‘Reply To’ address before they send the purchasing document. If you mark this option, you can edit the reply-to address in the Purchasing E-mail Detail Entry window or in the Payables E-mail Detail Entry window (for a remittance advice). The Purchasing E-mail Detail Entry window is not discussed later.
16. Allow Update of E-mail at Entry: Mark this box to change the E-mail message of the message ID when entering the sales document. You can edit the message in the Purchasing E-mail Detail Entry window or in the Payables E-mail Detail Entry window. If you don't mark this option, you won't be able to edit the subject or message body.

Whole Company Email Message Setup – Done once per Company.
Administration | Setup | Company | E-mail Message Setup
The Message Setup window defines what appears as the Subject and in the Body of a message E-mailed with a document attached to it. 1. Message ID: Enter an ID to identify the message. It’s a good idea to somehow indicate the associated Doc. Type in the ID. This is a 25-character field.
2. Message Type: Select Standard if you are creating messages for documents that you can send to customers or vendors. The other options are for Workflow. Workflow is beyond the scope of this document.
3. Series: Select the series in which you want this message to appear. The series available depends upon the message type. By selecting All, the message is available for all of the available series. You can’t select a document type or add fields to customize the message if Standard is the message type and All is assigned as the series.
4. Doc. Type: Select the type of Document that you want to assign to a message. This field is required when you select Standard as the Message Type and Sales or Purchasing as the series. If you use the Copy Email Message window to copy message information from an existing message ID to a new message ID, the Document Type is not copied to the new message, so beware.
5. Subject: Type how you want the E-mail subject line to read. You can insert fields here so that document specific information, such as document number and customer name from the document are displayed. Many fields are available. Select where you want the field to appear in the subject line and then select the field.
6. Body: This is where you type how you want the body of your message to read. You can insert fields here so that document specific information, such as the document number and customer name. Many fields are available; select where you want the field to appear in the subject line and then select the field.
7. Field: Select the field that you want to place in the message body or subject line. The fields available in the list depend on the document type you selected. Fields are not available if you select Standard as the message type and All as the series. The message shown in the screenshot below includes the {%SOP Number%}, {%Customer Name%}, {%Document Date%} and {%Customer PO Number%} fields.
8. Additional Fields checkbox: Marking this box will display additional fields in the Field list that you can embed for the selected document type. I was surprised at all of the fields available.
9. Have Replies Sent to: If you leave this field blank, the reply will go back to the message sender. Otherwise, enter or select an address that a customer or vendor can use to send a reply E-mail. For example, assume you have entered sales@company.com as the Reply To address. If you send a document in an E-mail to a customer, the customer receives the E-mail from Joe@company.com. When the customer replies to the E-mail, sales@company.com is used in the "To" field. The address you entered in the Sales E-mail Setup window, or the Purchasing E-mail Setup window is the default Reply To address. The Sales and Purchasing E-mail setup windows are covered later.

Customer E-mail Accounts – Done once per Customer
Sales | Cards | Addresses | Pull up the customer and address ID and then click the World ButtonThis is the Customer Address Maintenance window with the World Button identified.

The window opened by the World button is the Internet Information window. It’s on this window that you should enter your customer E-mail addresses. Enter the addresses on the To, CC or Bcc lines. If you have multiple addresses, enter them all and separate each with a semicolon. You’ll be able to choose the proper address(es) at the document level. The list of addresses to choose from comes from here. Note that the E-mail address is tied to the Customer’s Address ID, not the Customer ID.

Customer E-mail Options – Done once per Customer.
Sales | Setup | Customer | E-mail Button (in lower RH corner of Customer window)
Use the Customer E-mail Options window to select which documents you want to E-mail to the customer, the document’s message ID, and document format. You can either send documents as attachments or embed documents in the message body. If you send documents as attachments, you can select to send multiple attachments to the customer per document type and set the maximum file size of the document. COMPANY is set up to allow multiple documents to be attached to an E-mail.
If you have marked the Allow Update of E-mail at Entry option in the Sales E-mail Setup window, you can zoom back on the message ID, and edit the subject line and body of the message. We will be setting up COMPANY so that you can update the address at document entry.
1. Email Address based on Doc Type: If you choose the Enable radio button, an ellipses button will appear at the end of the row for each document type. With this button, you can select the default E-mail accounts to use for each document type. You can change these defaults at the transaction level if you wish. We’ll discuss how to change it at the transaction level next. The ellipses button will list each E-mail address you have set up on the Internet Information window for that particular customer’s Address ID. Each E-mail address will appear on a separate line in the window.
2. Send Forms as E-mail: Mark the checkbox next to the document types you want to enable for this customer. Only the document types you enabled on the Sales E-mail Setup window will be available to mark. Click the ellipses button to select the E-mail addresses for each specific document type.

The ellipses button launches the Email Address Based On Doc Type window. Listed in this window are the addresses you entered on the Internet Information window for a specific Customer ID and Address ID combination. The window below is for the Sales Order window. In the Apply To Other Doc. Type frame, you can select other document types to which you want to apply the selected E-mail addresses. These E-mail addresses will be copied over to the other document types and will appear on their Email Address Based On Doc Type window automatically.

Changing the E-mail address at the time of SOP EntrySales | Transactions | Sales Transaction Entry | E-mail Detail Entry Button
The location of the E-mail Detail Entry button on the Sales Transaction Entry window is identified on the screenshot below:

Use the E-mail Detail Entry Button to open the Sales E-mail Detail Entry window. Use the Sales E-mail Detail Entry window to update a customer's E-mail information. The changes you enter in this window will affect only the current document. To make permanent changes to the customer record for E-mail settings, make them using the Customer E-mail Options window.

Click on the E-mail button in the toolbar to E-mail the document directly from the Sales Transaction Sales Transaction Entry window:

Click the Print button on the toolbar to open the Sales Document Print Options window. On this window there are two checkboxes that you can use to indicate whether the document should be printed or e-mailed or both:
 How to E-mail the SOP Document - 3Sales | Transactions | Sales Batches | Print Button on Ribbon Bar
Click on the Print button on the toolbar to open the Sales Document Print Options window. On this window there are two checkboxes that you can use to indicate whether the document should be printed or E-mailed or both (see screenshot of window above). The difference is that by accessing it from the batch window allows you to E-mail an entire batch of transactions. However, when I tried to E-mail a batch of SOP transactions, nothing E-mailed. Most likely this was just a glitch that will be fixed up later. (perhaps I missed a Box To Check along the way)
I didn’t cover the POP side of e-mail, because my focus at this time is SOP. Please feel free to leave, comments, suggestions, or point out errors!
Live the dream!
Leslie
Use the Customer E-mail Options window to select which documents you want to E-mail to the customer, the document’s message ID, and document format. You can either send documents as attachments or embed documents in the message body. If you send documents as attachments, you can select to send multiple attachments to the customer per document type and set the maximum file size of the document. COMPANY is set up to allow multiple documents to be attached to an E-mail.
If you have marked the Allow Update of E-mail at Entry option in the Sales E-mail Setup window, you can zoom back on the message ID, and edit the subject line and body of the message. We will be setting up COMPANY so that you can update the address at document entry.
1. Email Address based on Doc Type: If you choose the Enable radio button, an ellipses button will appear at the end of the row for each document type. With this button, you can select the default E-mail accounts to use for each document type. You can change these defaults at the transaction level if you wish. We’ll discuss how to change it at the transaction level next. The ellipses button will list each E-mail address you have set up on the Internet Information window for that particular customer’s Address ID. Each E-mail address will appear on a separate line in the window.
2. Send Forms as E-mail: Mark the checkbox next to the document types you want to enable for this customer. Only the document types you enabled on the Sales E-mail Setup window will be available to mark. Click the ellipses button to select the E-mail addresses for each specific document type.

The ellipses button launches the Email Address Based On Doc Type window. Listed in this window are the addresses you entered on the Internet Information window for a specific Customer ID and Address ID combination. The window below is for the Sales Order window. In the Apply To Other Doc. Type frame, you can select other document types to which you want to apply the selected E-mail addresses. These E-mail addresses will be copied over to the other document types and will appear on their Email Address Based On Doc Type window automatically.

Changing the E-mail address at the time of SOP EntrySales | Transactions | Sales Transaction Entry | E-mail Detail Entry Button
The location of the E-mail Detail Entry button on the Sales Transaction Entry window is identified on the screenshot below:

Use the E-mail Detail Entry Button to open the Sales E-mail Detail Entry window. Use the Sales E-mail Detail Entry window to update a customer's E-mail information. The changes you enter in this window will affect only the current document. To make permanent changes to the customer record for E-mail settings, make them using the Customer E-mail Options window.

How to E-mail the SOP Document - 1
Sales | Transactions | Sales Transaction Entry | E-mail Button on Ribbon BarClick on the E-mail button in the toolbar to E-mail the document directly from the Sales Transaction Sales Transaction Entry window:

How to E-mail the SOP Document - 2
Sales | Transactions | Sales Batches | Print Button on Ribbon BarClick the Print button on the toolbar to open the Sales Document Print Options window. On this window there are two checkboxes that you can use to indicate whether the document should be printed or e-mailed or both:

Click on the Print button on the toolbar to open the Sales Document Print Options window. On this window there are two checkboxes that you can use to indicate whether the document should be printed or E-mailed or both (see screenshot of window above). The difference is that by accessing it from the batch window allows you to E-mail an entire batch of transactions. However, when I tried to E-mail a batch of SOP transactions, nothing E-mailed. Most likely this was just a glitch that will be fixed up later. (perhaps I missed a Box To Check along the way)
I didn’t cover the POP side of e-mail, because my focus at this time is SOP. Please feel free to leave, comments, suggestions, or point out errors!
Live the dream!
Leslie
4 comments:
I already tried this it was so nice techniques
Realvalue
Well, this is perfect timing as I was doing the same thing in my test environment. I'll go through your steps and will comment or ask questions along the way.
Thanks,
Sheila
Hello :) Well done, you made a really good and interesting tutorial with clear and understandable explanations of setting up E-mail in Dynamics GP. It's all new for me, but I try to learn fast how to use different features and functions.
Thank you for sharing!
Hi there! Good article, I'm actually trying to setup e-mails in Microsoft Dynamics AX. Anyway, if you want to know more about main principles in email introductions, I recommend you to visit: email introductions - main principles. I read there a lot of useful informations.
Post a Comment